When Sentry processes a WS-Security Header, the Timestamps are validated against the system time by default (for instance when verifying a signature). However, certain use cases may require a Timestamp be validated outside of processing a WS-Security Header.
A Timestamp in a request can be validated against either the current system time, or in a number of ways as desired by the specific use case. For example, the requirement may be to validate a Timestamp in the incoming request that it is within certain bounds. For example, the Created Timestamp in the following sample request might need to be 5 minutes or less from the current DateTime:
<soap:Envelope xmlns:soap="http://schemas.xmlsoap.org/soap/envelope/">
<soap:Header>
<wsse:Security xmlns:wsse="http://docs.oasis-open.org/wss/2004/01/oasis-200401-wss-wssecurity-secext-1.0.xsd" soap:mustUnderstand="1">
<wsu:Timestamp xmlns:wsu="http://docs.oasis-open.org/wss/2004/01/oasis-200401-wss-wssecurity-utility-1.0.xsd" wsu:Id="id-34138527c190e02560d739b3cfb811ecb66b811e">
<wsu:Created>2016-04-08T19:22:06Z</wsu:Created>
</wsu:Timestamp>
</wsse:Security>
</soap:Header>
<soap:Body/>
</soap:Envelope>
To do this in Sentry, the following steps are required:
- Generate the current Timestamp
- Create a template for the current Timestamp
- Create a template for the incoming Created Timestamp
- Feed the 2 Timestamps to an XSLT that returns the difference
- Use the Identify Document Task to validate the result
Create a Task List using the sample request document:
- Create the Sample Documents Needed for the Setup
a. Create the sample document that is based the incoming request for the purposes of mapping the Timestamp in question. Based on the above sample this would be used to map the Created Timestamp
This is accomplished by clicking on Resources-->Documents then New to create a sample document as seen next:
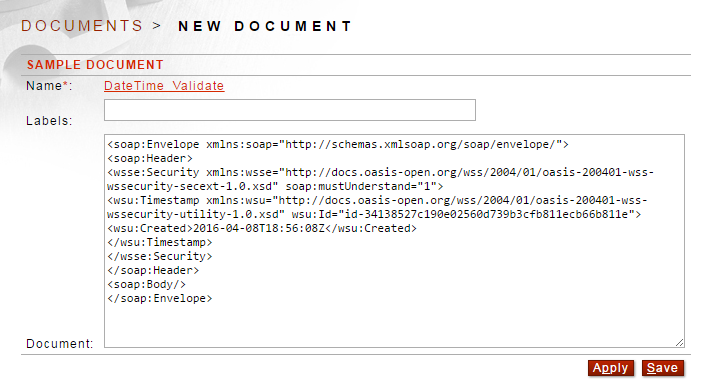
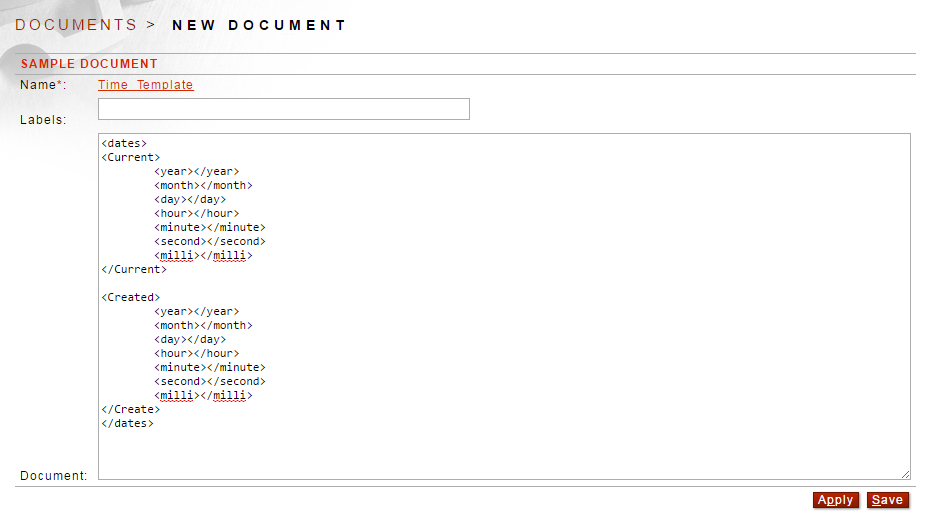
b. Create the document that will be used to Map the various element of an entire Timestamp.
This will be fed into the XSLT to do the calculations and return the difference (More on this below).
Click New, follow the prompts and Paste in the following in the PASTE SOURCE field:
<dates>
<Current>
<year></year>
<month></month>
<day></day>
<hour></hour>
<minute></minute>
<second></second>
<milli></milli>
</Current>
<Created>
<year></year>
<month></month>
<day></day>
<hour></hour>
<minute></minute>
<second></second>
<milli></milli>
</Create>
</dates>
2. Create a New Task List
This is accomplished by clicking on Gateway-->Task Lists then New to create a new Task List. Select the new document created in step 1 then click apply.

3. Generate the current Timestamp and Map to a template
a. Click New to create a new Task
b. Select Map Attributes and Headers and click Next
c. Type in a name under Task Name to signify the purpose, for example, “Generate CurrentTime”
d. Click New and fill in the information as:
Source Type: DateTime
Source Name:
Target Type: Template
Target Name*: {CuY}-{CuMM}-{CuD}T{CuH}:{CuM}:{CuS}Z
e. Click Save
The above setup will map the Timestamp generated by the function DateTime into a template that can be modified/manipulated to suit the purposes for this setup.

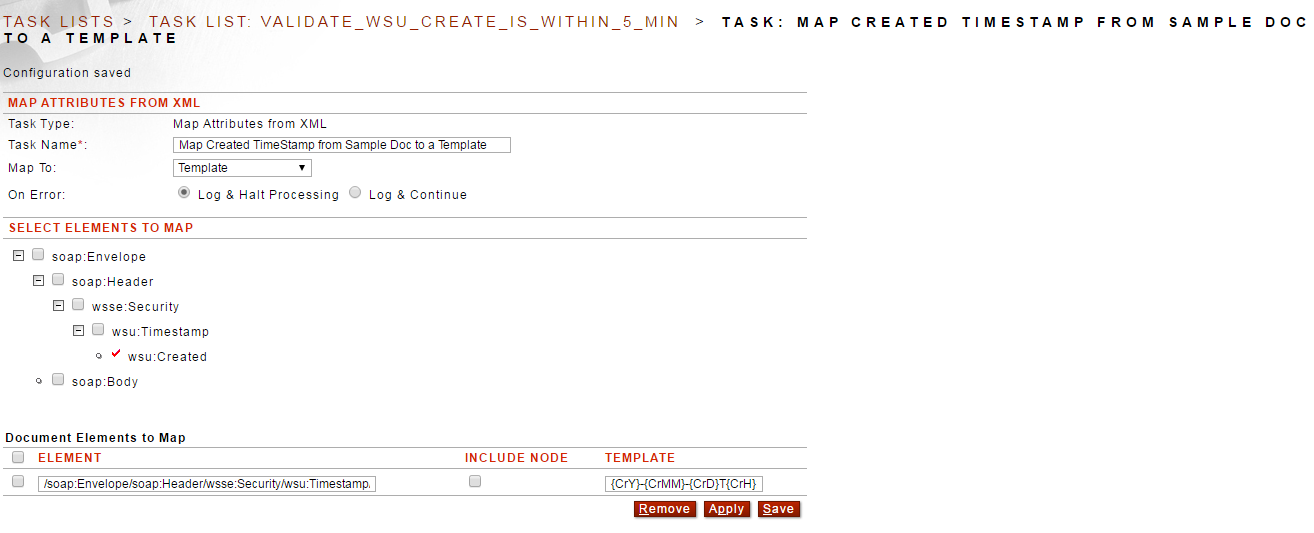
4. Map the Created Timestamp from the Sample Document to a Template
a. Click New to create another Task
b. Select Map Attributes from XML and click Next
c. Type in a name under Task Name to signify the purpose, for example, “Map Created Timestamp to Template
d. Select the element Created and click Apply
e. Paste the following in the TEMPLATE field:
{CrY}-{CrMM}-{CrD}T{CrH}:{CrM}:{CrS}Z
5. Create the Document to Present to XSLT for Transformation
a. Click New to create another Task
b. Select Replace Document and click Next
c. In the Drop Down select the document created in step 1.b. above and Save

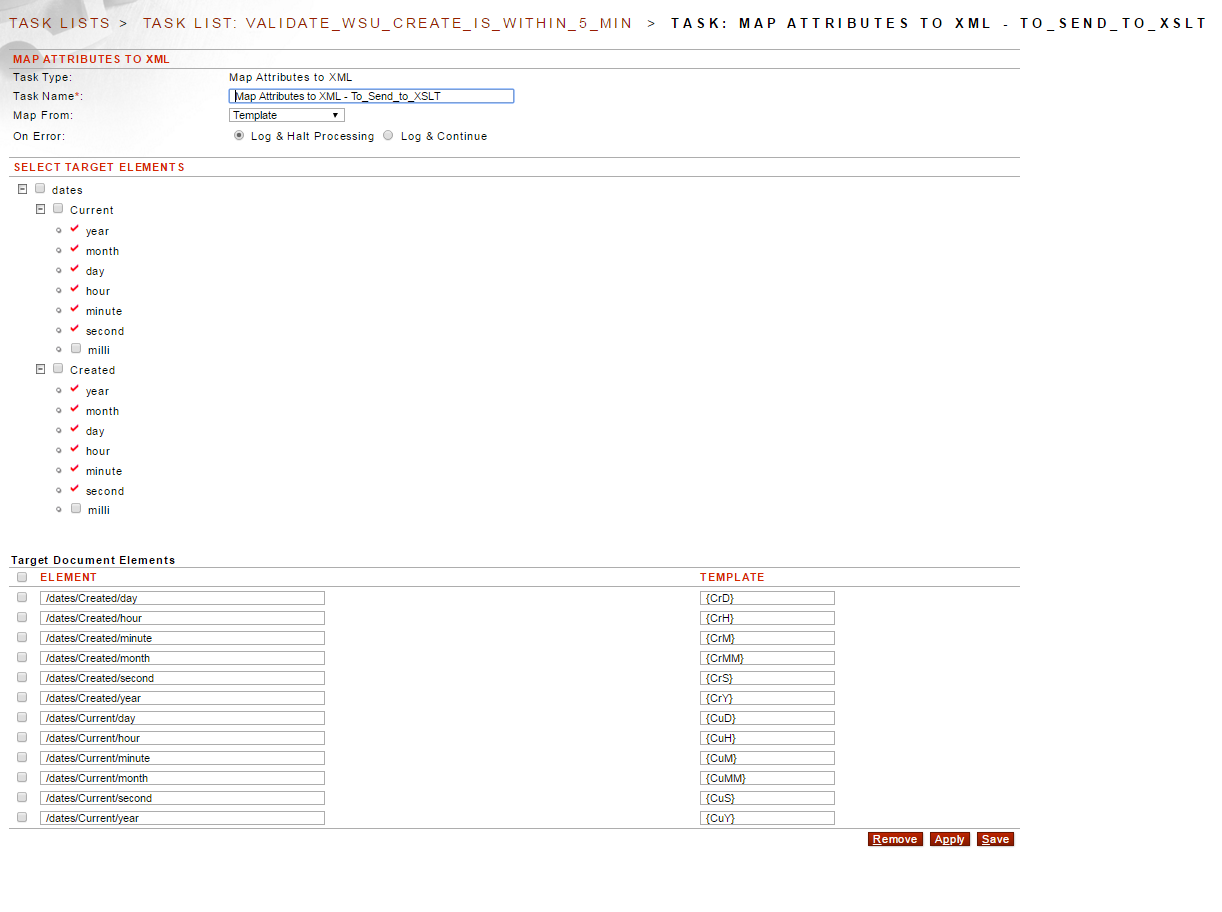
6. Map DateTime Attributes to Document to Present to XSLT for Transformation
a. Click New to create another Task
b. Select Map Attributes to XML and click Next
c. Select all elements as seen below and click Apply
d. Fill in the TEMPLATE fields as appropriate. For example,
CrD for Created/day, CuH for Current/Hour, etc…
7. Create a Transform Document Task that Returns the Difference Between Created and Current Timestamp in Seconds
This step requires an XSLT to do the transformation. The XSLT will take the document generate in Step 6 and return as a result the difference between Created and Current Timestamps in seconds.
Please, find the XSLT attached to this article. This XSLT takes the various components making the entire Timestamp as supplied by step 6, converts as appropriate then returns the difference in seconds. This is subtracting Created from Current Timestamps.
a. Click New to create another Task
b. Select Transform Document and click Next
c. Browse to select the XSLT and click Apply first to make sure there are no errors report then click Save
8. Testing before Adding a Validation Task
Note: Running tests will result in errors unless the Created date/time in the sample doc imported as part of the FSG is updated with a date/time in zulu time, as compared to the current date/time. One way to do this is to enable DEBUG mode logging for system logs then run the task once. Check the log to find the current date/time:

Edit the sample doc and change the Created date/time to match. Run the task again and it should now be a few seconds behind the system time which will result in a success.
a. Testing at the Task List Level
At this point the Task List should look as:

Test the setup by clicking Run (highlighted in the above image). Please allow popups to see:
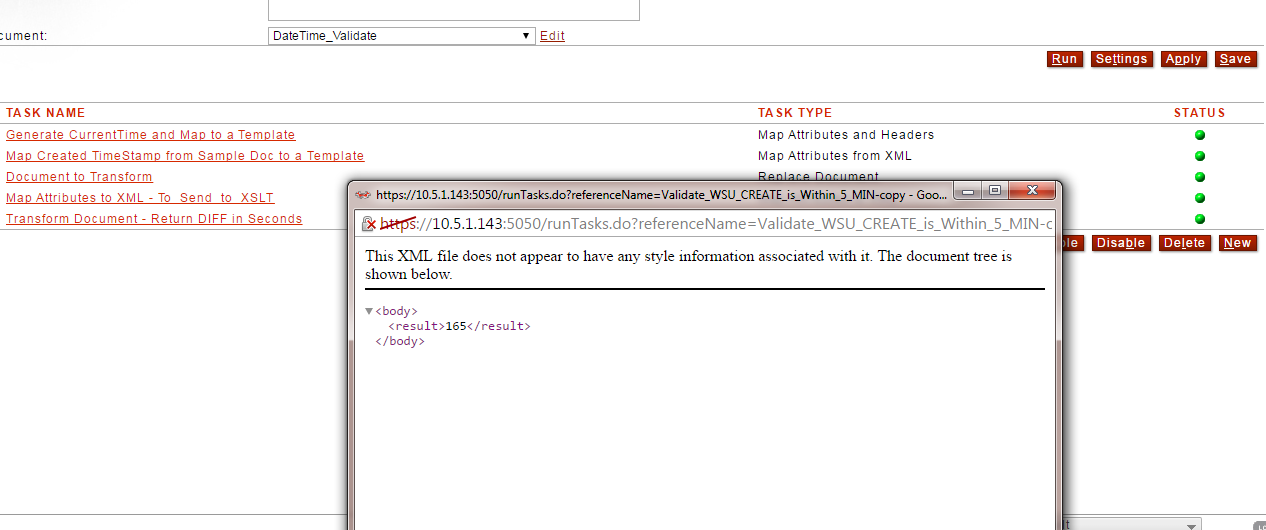
Now edit, as highlighted above, and make changes to the Created Timestamp to run further testing.
b. Create a Task List Group and Add the Task List to it then Associate the Group to a new Content Policy for Testing Purposes
c. Send Requests to the new policy as seen below using SOAPSonar, for example:
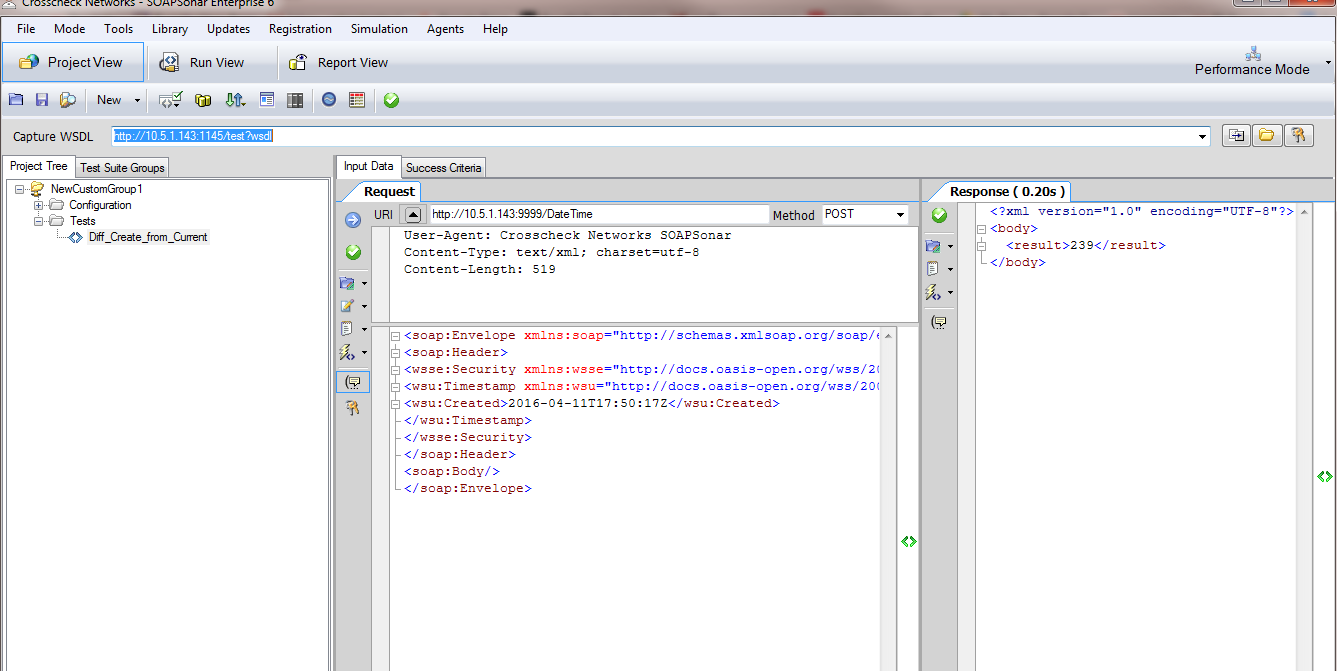
9. Add a Task to Validate the Result
At this point a Task takes the return and validates that it is within a certain bound. For example, below is a Task that validates that the Created time is within 5 minutes from the Current Time.
a. Click New to add a new Task
b. Select Identify Document and click Next
c. Select Result and click Apply (Result is returned by the XSLT)
d. Set the COMPARATOR to <= and a VALUE of 300
e. Click Save
10. Final Testing
This step is a repeat of step 8 above except that when the difference is greater than 5 minutes (300 seconds) the return to the client is a failure.
a. A Failure Response Example
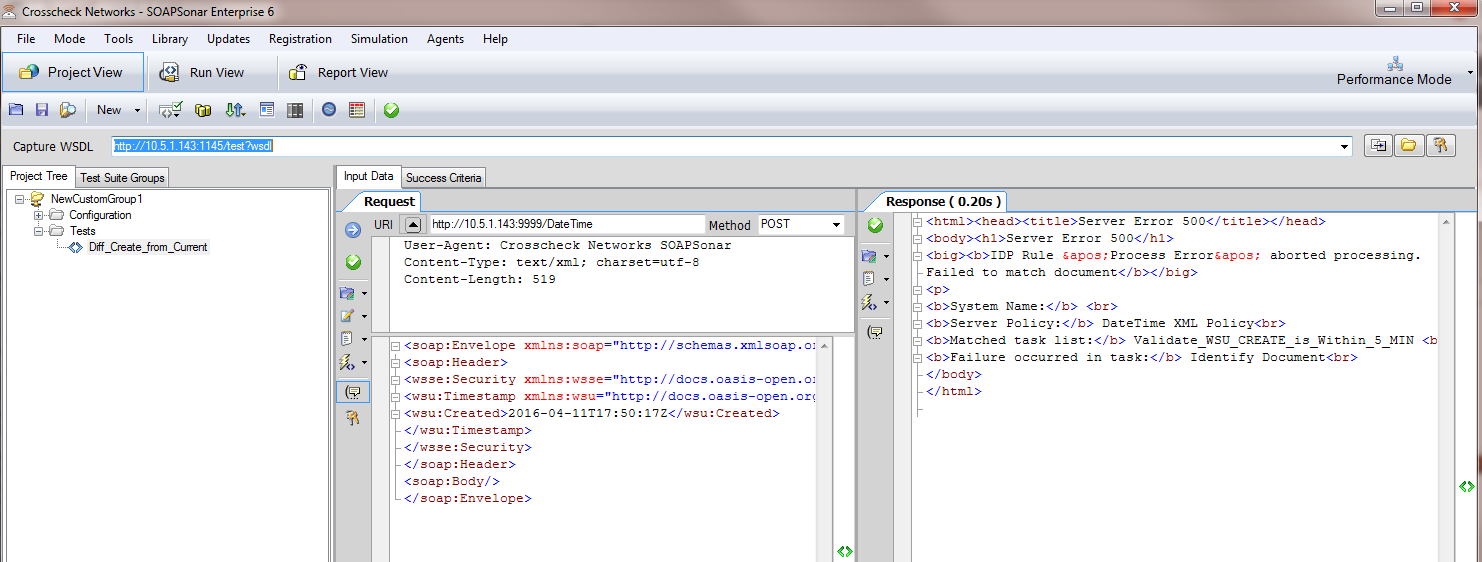
See Custom Error Handling to format the response to the client.
b. A Successful Response Example

Attached are FSGs (import password is password), one for version 8.3 and the other for 8.5. Once imported please make the needed changes to suit the use case in question.

0 Comments